

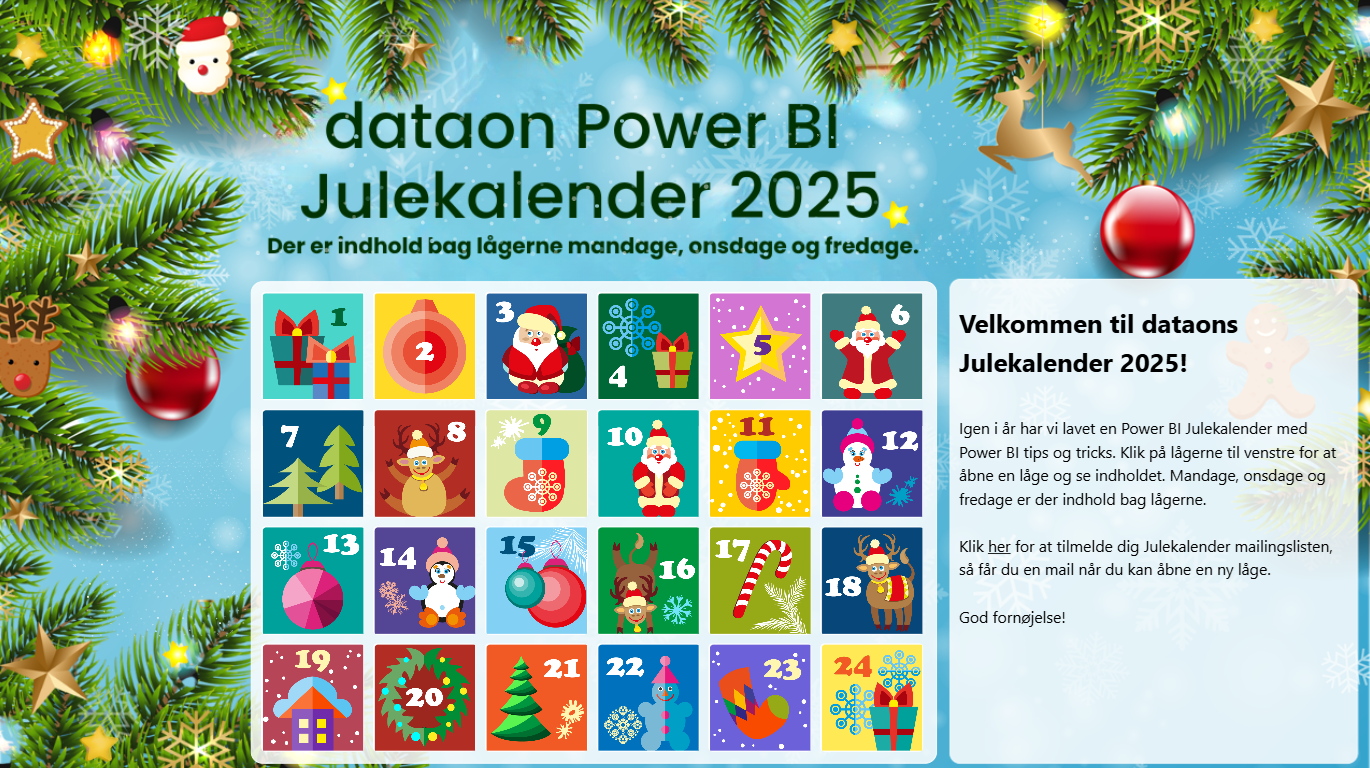
Velkommen til dataon's Julekalender 2025!
Hver mandag, onsdag og fredag frem til jul kan du åbne en ny låge.
Tilmeld dig vores mailingliste og modtag en mail på dagen.
19. december
Tema
Sådan laver du dine egen Julekalender
(lavet af Frederick Jensen)
I dagens artikel kan du læse om hvordan jeg har lavet Julekalenderen og du kan bruge det som inspiration til at lave dine helt egen Julekalender. Artiklen er på engelsk. God fornøjelse :-)
Creating an Advent calendar
Creating an Advent calendar is actually quite easy. The most time-consuming part is producing the content for each door. In this article, I’ll share the basic idea behind how I built the Advent calendar. You can use the approach to create your own Advent calendar. You’ll need to fill the doors with content that fits your purpose. It could be about Power BI, the company you work for, or an organization you’re part of.
The Advent calendar I created this year looked like this:
In this article you will find information about:
1 What you need to create the calendar
2 How to create it
3 How to publish it
1 What you need to create the calendar
A background.
You need a great background image. Ask ChatGPT to make one for you.
24 images for the doors.
These images are shown when a door can be opened. You need 24 images. Again ChatGPT can help you. The images must be named: [DayNo]-1.png. E.g. 1st of December: 01-1.png. Upload the images to a web server.
24 dark images for the doors.
These images are shown when a door cannot be opened yet. For example, if it is the 2nd of December, only the doors for the 1st and 2nd can be opened; the rest appear dark (inactive). I used https://pinetools.com to change the brightness of the images. The images must be named [DayNo]-0.png. E.g., for 1st of December: 01-0.png. Upload the images to a web server.
A data table.
A table containing the content of the calendar. Create it in Excel and load it to Power BI or just create the table in PowerQuery. The table has to contain two columns and 24 rows. The columns are:
Date (door date, e.g. 20240112)
HTMLContent (door content in HTML which is shown when a door is clicked and opened)
One row for each day is needed in the table. Here is an example of 24 rows where I have added sample data for the first row.
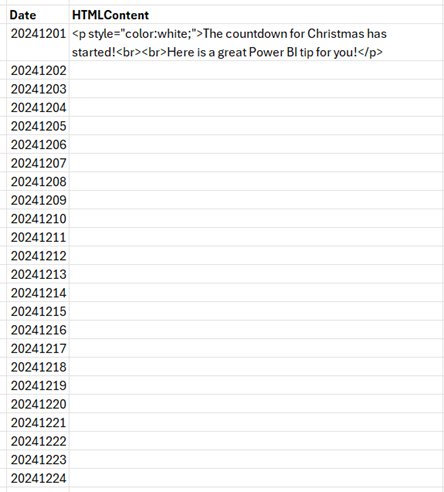
The most time-consuming part of creating the calendar is producing the actual content found in each door. Add the content to the HTMLContent cell for each row. You can use HTML!
Apart from the above you need four DAX calculations:
Location of the images:
ImageServerPath =
"https://[server]/[Folder]/[Folder]/"
Variable containing today’s date. It’s used in other measures and makes it easy to test the calendar by adding hard-coded values instead of using Today():
TodaysDate =
VAR dd = Today()
RETURN
VALUE(FORMAT(dd, "yyyymmdd" ))
Calculation of the image and file path used for a door:
DoorImage =
VAR CellDato = SELECTEDVALUE('DataTable'[Date])
VAR FilePostFix = if(CellDato<=[TodaysDate], "-1.png", "-0.png")
VAR DayNo = Right(SELECTEDVALUE('DataTable'[Date]),2)
RETURN
[ImageServerPath] & DayNo & FilePostFix
The text that is shown to the right of the Advent calendar when a door is opened. You might want to change the default texts in this measure to match your own Advent calendar:
DoorText =
// get door content
var DoorContent = min('DataTable'[DoorContent])
// how many doors are selected
VAR selected = COUNTROWS('DataTable')
// if one door is selected, then get the date
VAR DoorDate = if(selected=1, SELECTEDVALUE('DataTable'[Date]))
// if one door is selected, then get day number
var DayNo = if(selected=1, Right(DoorDate,2) )
// check variable set to 1 if the door can be opened else 0
VAR Check = if(selected=1 && DoorDate <= [TodaysDate],1,0)
VAR textbody = if(selected=1, if(Check=1, "<h3 style=""color:white;"">" & DayNo & " December</h3>" & DoorContent, "<p style=""color:white;"">" & "The selected door can not be opened yet!" & "</p>"), "<p style=""color:white;"">" & "Welcome to this exciting Power BI Advent calendar. You will get tips and tricks for Power BI!<br><br><br>Have fun!" & "</p>" )
RETURN
textbody
2 How to create the calendar
Now you have:
* Created a background image
* Uploaded the 2 x 24 door images to a webserver
* Loaded a table into Power BI containing 2 columns and 24 rows
* Created four DAX calculations
You are now ready to create the visual part of the Advent calendar. There are only three things you need to do:
2.1 Add the background image to the report
Go to "Canvas background", upload the background image and set the "Transparency" to "0%"
2.2 Add the button slicer visual to the canvas
Drag the "Button Slicer" onto the canvas and resize it .
Now you need to set a number of properties on this visual:
* Disable the background in "General\Effects\Background"
* Add the “Date” column to the “Value”.
* Add DoorImage as image in "Image\Image\Field"
* Disable “Values” in “Callout”.
* Change “Multi-Button Layout\Layout” to 5 rows and 6 columns
* Change “Image fit” to “Fit” in “Image\Image”
* Set “State” in “Button\Apply settings to”: “Default”. Then disable “Background” and “Border”
* Set “State” in “Button\Apply settings to”: “Hover”. Then disable “Background” and “Border”
* Set “State” in “Button\Apply settings to”: “Pressed”. Then disable “Background” and “Border”
* Set “State” in “Button\Apply settings to”: “Selected”. Then change “Border” to “Red” and disable “Background”.
2.3 Add the HTML Content visual to the canvas
The HTML Content visual is a custom visual. If you don’t already have it, you can import it from Microsoft AppSource. Kudos to Daniel Marsh-Patrick for developing this visual!
Add the “DoorText” column to the “Values”. Enable “Allow opening URLs” found in “Content formatting\Behavior”.
3 How to publish the calendar
Now your Advent calendar is finished! The final step is to make it available for others to enjoy.
Publish the report to the Power BI Service, then share it using “Publish to Web". This will generate a public embed link or iframe code that you can share on a website, intranet, newsletter, or social media. Anyone with the link will be able to open the calendar and interact with the doors. No Power BI license required.
I hope you are going to have a lot of fun creating your very own Advent calendar, and that it brings a little extra joy and engagement to everyone who opens it.